Showing posts with label Home Decor. Show all posts

Helen's "New" Chair

Helen's New Chair
Painted Chair
Helen's new chair

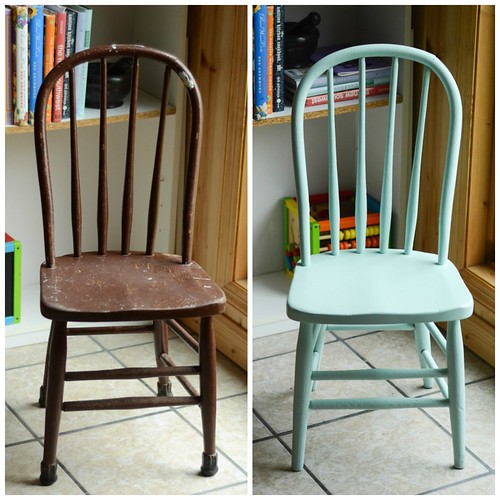
I've been wanting a little chair for Helen ever since she sat in Auntie Judy's rocking chair. Little did I know there was one right in our house! Reuben found a well-used children's chair hiding in our storage room. Immediately I thought of painting it. So I did some research about non-toxic paint and purchased a sample jar online

When my sister Audra and her kids got wind of my plans they wanted in on the process. Much to my delight they offered to sand the chair for me. Then on a windy and sunny afternoon I painted it. It took three coats.

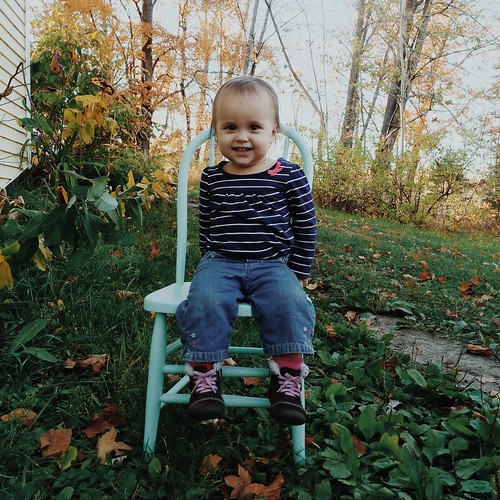
I'm quite pleased with the results. Now I just need to buy/build a little table for Helen. Then I think her happiness would be complete. 


The sample size can was only around $4 or $5 when I purchased it. 


Note: Some links are affiliate. All opinions are my own. I wouldn't share something with you guys if I didn't like it.

December Photo-a-Day 2013: Day 3


Feels Like Winter
Today’s photos is actually a diptych. Outside we have a heavy dusting of snow. I brought some boughs inside for our “Christmas Tree” — I’ve decided not to get a REAL tree this year since it would be a major headache to try to keep Helen from wrecking it. :) I’ll probably add some baubles later…maybe some lights if I get really ambitious.

2 Responses to December Photo-a-Day 2013: Day 3

  1. Carissa @ Pretty/Hungry 
    You and I had the same thought this year with a mini-version of a real tree. Smart!!
  2. Erica Lea 
    Carissa: I’m sure yours is much prettier than mine. I’ll have to try to be more organized next year. :)

Christmas Garland Tutorial + Our Christmas Tree & Decorations


004
I liked my autumn garland so much that I decided to recycle the basic elements into a Christmas garland.
010

To make your own Christmas Garland, here’s what you’ll need:

Follow the instructions for the autumn garland, replacing the waxed leaves with ornaments and pine tree branches. And you’re done!
009
Now for a peek at our Christmas decorations. I went for simplicity this year with glass containers filled with small ornaments, festive candles and pine cones.
011
014
Our tree is definitely of the Charlie Brown variety, but I like it anyway.

How are you decorating your house for Christmas this year?


8 Responses to Christmas Garland Tutorial + Our Christmas Tree & Decorations

  1. Anna 
    That’s a super cute tree! And I love the garland, sometimes less is more -even at Christmas!
    I collected lots of acorns and I’ve taken out the “seed” and put golden glitter on it and glued it back into the seedcap, I’m planning on hanging them in the tree which we don’t decorate until the 23rd. Apart from that, I’ll decorate it with red glassballs and glittery golden ones along with real candles. Can’t wait!
    Have a lovely Christmas!
  2. Jackie 
    Lovely! I adored your leaf garland. What font did you use on the word ‘ garland’?
  3. Erica Lea 
    Anna: Love your ideas for decorations! Someday I want real candles on our tree. :) That’s neat that you wait until the 23rd – I’m just too impatient. :P
  4. Erica Lea 
    Jackie: Thank you! The font I used is “Men in Black Credits” — you can download if for free from dafont here: {link}
  5. Bec 
    Your tree is gorgeous! It glows from within.
  6. Samantha 
    I love the simple, yet beautiful decorations and the tree is so cute!
  7. Erica Lea 
    Bec: Thank you! We tried to get the lights all over the branches so as to combat the Charlie Browness. ;)
  8. Erica Lea 
    Samantha: Mmhmm – I like simplicity in decorations. :)

DIY Fall/Autumn Leaf Garland


040

Time for an autumn tutorial!
033
Here’s what you’ll need to make your own fall leaf garland: a length of yarn, a couple of pins or nails, miniature wooden clothespins and pressed or wax-dipped leaves.
031
  • Measure how far up the wall you’d like to place your garland (I went slightly above eye level), and place a pin or nail in that spot. I used a pin because that leaves the least damage on our sheetrock walls. If you don’t mind poking holes in your walls, you could always use nails or whatever else you’d like.
  • Measure up the same distance where you’d like your garland to end and place the other pin in the wall.
  • Tie one end of the yarn onto one of the pins. Stretch it across to the other pin and tie in place. Make sure to pull the string a bit more taught than you’d like the finished garland to hang since the leaves will weigh it down.
  • Clip your leaves to the yarn with the mini clothespins at even intervals.
  • And you’re finished!
041
I plan to reuse this clothesline for winter/Christmas – maybe hang pine cones and tiny pine branches interspersed with miniature Christmas tree globes.
What are you doing to decorate your house for fall?

8 Responses to DIY Fall/Autumn Leaf Garland

  1. Megan 
    That’s a neat idea!
  2. Kathryn Grace 
    Very fun and easy! Great that you can quickly change out decor by clipping new items to the line.
    By the way… I love the block font you used – could I ask the name of it and if you found it free or bought it?
  3. Erica Lea 
    Kathryn: Yes, I can’t wait to try something else for Christmas. :) Yeah, I really like that font. It’s called “Sketch Block” and I got it for free here: {link}