Showing posts with label Hair. Show all posts

Fresh Cut

New Haircut
Top: Milk Nursingwear in Coral

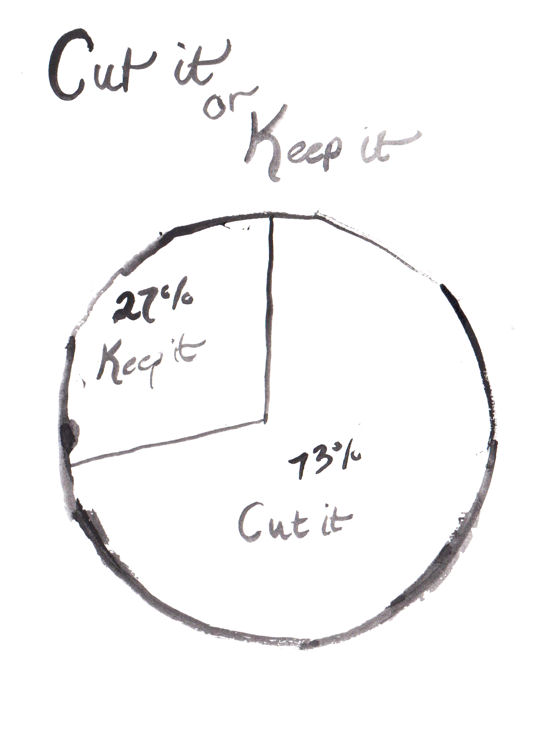
I love my new cut, you guys! 

My hair feels so much lighter and softer. And I can still pull it into a ponytail. I asked the hair stylist give me "soft" layers. Overall I was quite pleased with my first experience at a hair salon.

Though I'm sure I was pretty awkward. I told the lady right away that this was the first time that I had had my hair professionally cut and she said, "You'll be just fine, dear." She thought I was 19 or 20.

She offered to curl my hair for three more dollars, and I decided to go for it rather than pull out all of my stuff at home (we were going to my family's later that day and I didn't know if I would have time to curl it myself).


Before & After

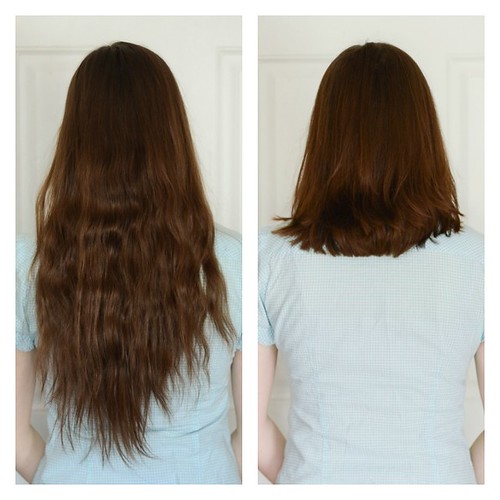
Anyway, here's a before and after shot of the back. My hair was pretty scraggly, wasn't it? I don't think it had been trimmed for over a year. 


How do you have your hair cut at the moment? Do you like it?


Note: links are affiliate.

I'm Going to Chop It!


Cut it or Keep It

You guys decided, by a land slide, that I'm going to chop off my hair!

I'm excited because I've decided to get it cut at a salon, and I have NEVER had my hair professionally cut.

The look I'm going for is collarbone length with soft layers. I'm still on the fence about whether or not I should try bangs again...


Here are some of the inspiration photos I want to show my stylist (whoever it may be):

Image from Box No. 216

This is very pretty. I wish I was brave enough to try a bit of ombre. Maybe I'll have to give lemon juice a whirl this summer.


Edgy and sexy hair cut this winter is the collar bone length hair cute with a heavy side bang.  #sexyedgyhair #winterlook2013
Image from Alex Crabtree

I really like this one as well. I know my hair wouldn't be this fluffy unless I curled it, but it shows me the potential. :)


Now I just need to find someone willing to watch Helen (I may just go after she's in bed some night) and set up an appointment.


Thank you all for helping me decide!
xoxo
Erica


Cut It or Keep It? YOU Decide!

Cut It or Keep It
I have been thinking about getting my hair cut for quite some time. The last time I had an appreciable amount lopped off was a couple of summers ago. The ends are getting split, so I'm definitely due for a trim. 

Here's my dilemma: My hair is at a length right now that is very easy to braid and put into a bun. However, my head starts to hurt if my hair is in a bun for very long. Also, I never curl my hair anymore because there's no point: the curls just fall out of my heavy hair.

So, I've decided to let YOU, dear readers, decide for me!

I would get my hair cut to about the length in the photo to the left - maybe a little longer (I would be going for collarbone length). Right now my hair is almost as long as it is in the photo on the right (maybe a bit shorter). BTW, that photo was taken when I was 17. Woot.

So, just leave a comment saying, "Cut it!" or "Keep it!" You can give me your reasons for chopping it or letting it stick around if you like.

I'll tally up the answers next Tuesday and let you know the results!

My fate is in your hands.

xoxo
Erica

December Photo-a-Day 2013: Days 19 + 20


Knuckle Rings
Self Portrait
Curlz
Fake Laugh
I’m sharing more than two photos from the past couple of days. Because reasons. The first is from yesterday, the other three from today.
1| My new knuckle rings. 2| Self portrait. 3| Mah curlz. It’s a good idea to document them since I rarely have time to curl my hair these days. 4| Helen’s fake laugh. Silly-head.

2 Responses to December Photo-a-Day 2013: Days 19 + 20

  1. Annie 
    Love those rings! And your long pretty hair. And that adorable baby smile. I just love all your pictures. :)
  2. Diane 
    You’ve grown into yourself, Erica. Lucky Reuben. ; )

December Photo-a-Day 2013: Days 14, 15 + 16


Bath Time!
Christmas Bokeh
French Braided Updo | Photo by Reuben
Hello friends!
Did you have a good weekend? I thought my sister was going to have her baby yesterday, but it all came to naught.
The last photo is a bit of a cheat – Reuben offered to take a picture of my hair when he saw me struggling to get a shot in the bathroom.

Boho Ponytail


Boho Ponytail
Boho Pony
Stinker
As a mom, it’s harder to find hairstyles that are feasible. They need to be comfortable and last all day. Most days I opt for a simple braid or pony. Lately I’ve been trying to put a little more effort into my daily hairstyles (it doesn’t always happen).
And so, as requested, here’s a hairstyle that I tried out today. I don’t have time to film and edit a tutorial right now, but no worries: Kaley’s got your back. You can watch her tutorial for this boho ponytail HERE.
I did mine a little differently – I left out the knot and just secured everything with an elastic at the back of my head and wrapped a piece of hair around to hide the hairtie.
And of course I had to include of photo of Helen. Little stinker.
I was TRYING to paint my toenails today, but she kept following me around, trying to grab my toes or the polish bottle. She finally managed to smudge my big toe. Silly-head. I love her so.
Photo credit goes to Reuben.
And I know it’s super annoying that the back of my shirt is turned up in the first photo. Oh well.
What’s your go-to hairstyle for active days?

2 Responses to Boho Ponytail

  1. Liz 
    HAHA, I didn’t even notice that your shirt was turned up till you mentioned it. I too love boho braids, but I am also lazy. I will make a point to try this one though!
  2. Kristin 
    I love this and will try it on my 10 yr old – she’s very into braids right now! Also, didn’t notice your shirt until you pointed it out lol. Thanks for sharing :)

Fishtail Braid & Bun Tutorial


Fishtail Braid
Fishtail Bun
Time for another hair tutorial! Learn how to do this messy fishtail bun on yourself.


Watch the video below for instructions.

(If video won’t load, watch on YouTube here)


Braided Bangs Tutorial

 photo 020-3.jpg

Here’s an easy way to spice up your ponytail.


Watch the video for directions…


Easy Elegant Updo or Half Updo Tutorial

 photo 007-6.jpg

Time for another hair tutorial! It’s been a little while, hasn’t it.
Inspired by a photo on Pinterest (which I can no longer find), I decided to recreate this elegant updo.

Watch the video below for the directions:


My Hair Today

 photo 001-10.jpg

Hey, everyone! Can you believe it’s May already? Crazy, I know.
Thought I’d share how I’m wearing my hair today. Inspired by this photo.
Perhaps I’ll make a tutorial for ya’ll sometime.
How are you wearing your hair today?
Erica Lea

1 Response to My Hair Today

  1. Megan 
    Very Pretty!!

Purdy Things


blogpic (4 of 4)
Photo by Daniel

Stylish:


This outfit. | This girl’s style. | “Femme Fatale” |Ruche | eShakti | “Mint Milkshake” on Modcloth | French Connections | “Vast Wrap” skirt on Anthro |

Hairstyles:


What sorts of pretty things have you been discovering lately?
xoxo
Erica

Haircut


Haircut
Last Friday, I had my mom cut my hair to a bit longer than shoulder length and slightly layered. I’ve been having fun playing with new styles. Now I get to show ya’ll some short hairstyles!
Hope you have a lovely weekend!
What’s your favorite way to wear your hair? What styles make you feel pretty?

3 Responses to Haircut

  1. The Morton Maiden 
    Very cute hair cut!
    I love wearing my hair down and curled using the technique you posted about here:http://www.ericalea.com/2011/03/26/curls/ (thank you, by the way, for that post! It has been so fun for me to curl my hair in a relatively fast way that actually stays in my thin hair!)
    A favorite hairstyle for me is also a simple bun with side swept hair in the front.
    My newest favorite hairstyle is one my sister showed me where you french braid your hair on the side, then put it in a side bun with a flower pinned in. I found it to be a fresh, new way to style my hair!
    ~S~
  2. DessertForTwo 
    It looks stunning :)
  3. Natalie 
    Hey Erica! I just wanted to finally take a minute to tell you that I’ve been reading your blog for a while and have loved it! =) And I love the new hair cut too! Blessings!

Side Swept Curls with Twist Hairstyle Tutorial


Here’s a quick, glamorous hairstyle that looks like you spent loads of time curling your hair. However, you only need to curl a small section of hair, which only takes a few minutes!

What you’ll need:


  • A curling iron (I used a 1.5-inch curling iron)


  • A brush


  • Bobby pins (I used around 15)


  • Hairspray (for holding the finished style)


  • Watch the video for directions:


    Bedhead to Elegant Updo [Video] Tutorial


    Inspired by my sister-in-law and friend, Breanna, who has an awesome hairstyle/fashion/personal blog, I’ve decided to share a tutorial for a quick, easy, and elegant updo that will transform your messy hair into a neat, beautiful, romantic hairstyle.

    You’ll need:
    • About a million hairpins
    • Hair flowers or other hair accessories (optional)

    Note: my hair had a bit of texture in it from the previous day, so if your hair is very flat you may want to add some product. I love TRESemmé 24 Hour Body Spray Gel.


    And here’s the tutorial:


    4 Responses to Bedhead to Elegant Updo [Video] Tutorial

    1. Sereina 
      Very pretty! I love the flowers you added.
    2. Susanna 
      Loved it! Absolutely beautiful–think I’ll have to try it!
    3. Steffani 
      Hello Erica! I am a new reader of your blog, and I would like to tell you how much your blog fascinates me.
      Thank you for this tutorial. It’s a very good timing, since I crave to learn more hairstyles for my unruly hair.
      I am looking forward eagerly to your future posts! :)
    4. Kathryn Grace 
      Lovely! I have done a similar style to this on someone else but I haven’t tried doing on myself. It’s so nice to see tutorials for updos with straight hair! It is so hard to achieve a nice looking updo if you don’t have curls.

    Curls


    Discovered a new way to curl your hair. It is so easy and comfortable to sleep on. {link}
    Photo credit: Amanda Berge

    4 Responses to Curls

    1. Sereina 
      I love it! I’m going to try that technique!
    2. Sara W 
      Beautiful! I’m going to have to try this.
    3. Hannah 
      I tried this last night and it worked great! Such a fun, no-hassle way to curl long hair!
    4. Kathryn Grace 
      It looks so nice and natural. A lot of times if I curl my hair with the curling iron it comes out so poofy that it really doesn’t look good to just leave it down. I’ll have to try this!

    Haircut


    On Saturday, Amanda and I had Mom cut our hair. When Amanda saw the pile of our combined hair she cried “We’re bald!”
    2-14-10n5
    ~
    Photo Credit: Amanda Berge
    group2

    group1
    The new style is not much different, just shorter. We both like our new cut very much!
    .
    Copyright © 2010 by Erica Lea

    8 Responses to Haircut

    1. rachel 
      You two are beautiful!!
    2. Samantha 
      VERY nice!!!!!! What did you do with all the hair? Donated to locks of love? :D
    3. Ruth Ann 
      those are pretty layers! did y’all use a book to learn how to, or did you just learn on your own?? :)
    4. Ruth Ann 
      oh and Erica, is there any way where you can give the option to ’subscribe to comments’ so I wouldn’t have to come back here for responses? thanks!
    5. Jennifer 
      GORGEOUS :)
    6. Erica Lea 
      Ruth Ann: At the very bottom of the page there is an option to subscribe to comments. If you have any trouble, just let me know and I’ll try to fix it.
    7. Melanie 
      I agree with Rachel…you girls are absolutely gorgeous (both inside and out)!
    8. Erica Lea 
      Ruth Ann: I think my mom learned from a book. She just uses something to measure our hair with and cuts it all the same length. For a quick layering, I like to have my sisters hang their head over a counter or table and I just cut it off straight. When the stand up, their hair is layered!

    Simple Three Strand Braid

    I first learned how to braid by making bread. It was so easy to cross the ropes of dough over each other to make French bread. But braiding my own hair was another matter. I would invariably end up frustrated and discouraged. But my sister encouraged me to keep trying, and eventually I succeeded at braiding a (very messy) simple braid.
    Here is a tutorial to help you succeed with your first braid.
    m
    Simple Three Strand Braid Tutorial

    1) Begin with neatly combed hair. There are few things more aggravating than snarly hair.
    2) Separate your hair into 3 equal strands and hold them apart with your fingers.
    3) Cross the far right strand over the middle strand. This is the new center strand, and the center strand is the new far right strand.
    4) Cross the far left strand over the center strand. This is the new center strand, and the center strand is the new far left strand.
    5) Continue in this manner (alternately crossing the far right and far left strands over the center strands) until you reach the desired length.
    6) Tie off the braid with a ponytail holder, small rubber hair bands, ribbons, or whatever you wish.
    This skill is the basis for many different hair styles.   Experiment by making two equal-sized braids,  making two small braids on either side of your head and gathering them together at the center of your head, coiling the braid into a bun, etc. Be creative!
    f
    © 2009 by Erica Lea


    2 Responses to Simple Three Strand Braid

    1. Simply Vintagegirl 
      What a lovely tutorial! The photographs are charming and the hair looks so soft and silky! I have inherited a bit of wildness to my hair (it is curly, but without gel it will be twice the size of my head by the end of the day). :) Once my hair is longer, I will be able to try (again) to do my own braid (when my hair was longer I tried, but it was never satisfactory). This morning I had my dear mother French braid my hair (it is finally long enough! yay!).
      I’m not quite sure what kind of strawberries we grow. They are small, but delicious. There is the occasional plant that produces misshapen berries, but still taste good.
      Joyfully in Christ,
      Emily Rose
    2. Erica Lea 
      Thank you, Emily!